OpenHAB voice control for home automation
Using entirely local technologies and services
Introduction
OpenHAB is one of the more programmer oriented home automation systems. Allowing users to easily extend functionality with custom scripts in various programming languages with well documentated APIs. While there are certainly many integrations to feed data from peripherals and services into the system, the last mile of tying all the glue logic together usually falls on the user.
A similar scenario applies to voice control for OpenHAB. Many external services can easily be incorporated into OpenHAB to provide services as Text to Speech (TTS) and Speech to Text (STT), tying them all together to automatically take action upon a voice command requires several steps.
This articles show the detailed setup of how to get voice control working in OpenHAB using entirely local services that do not require an internet connection.
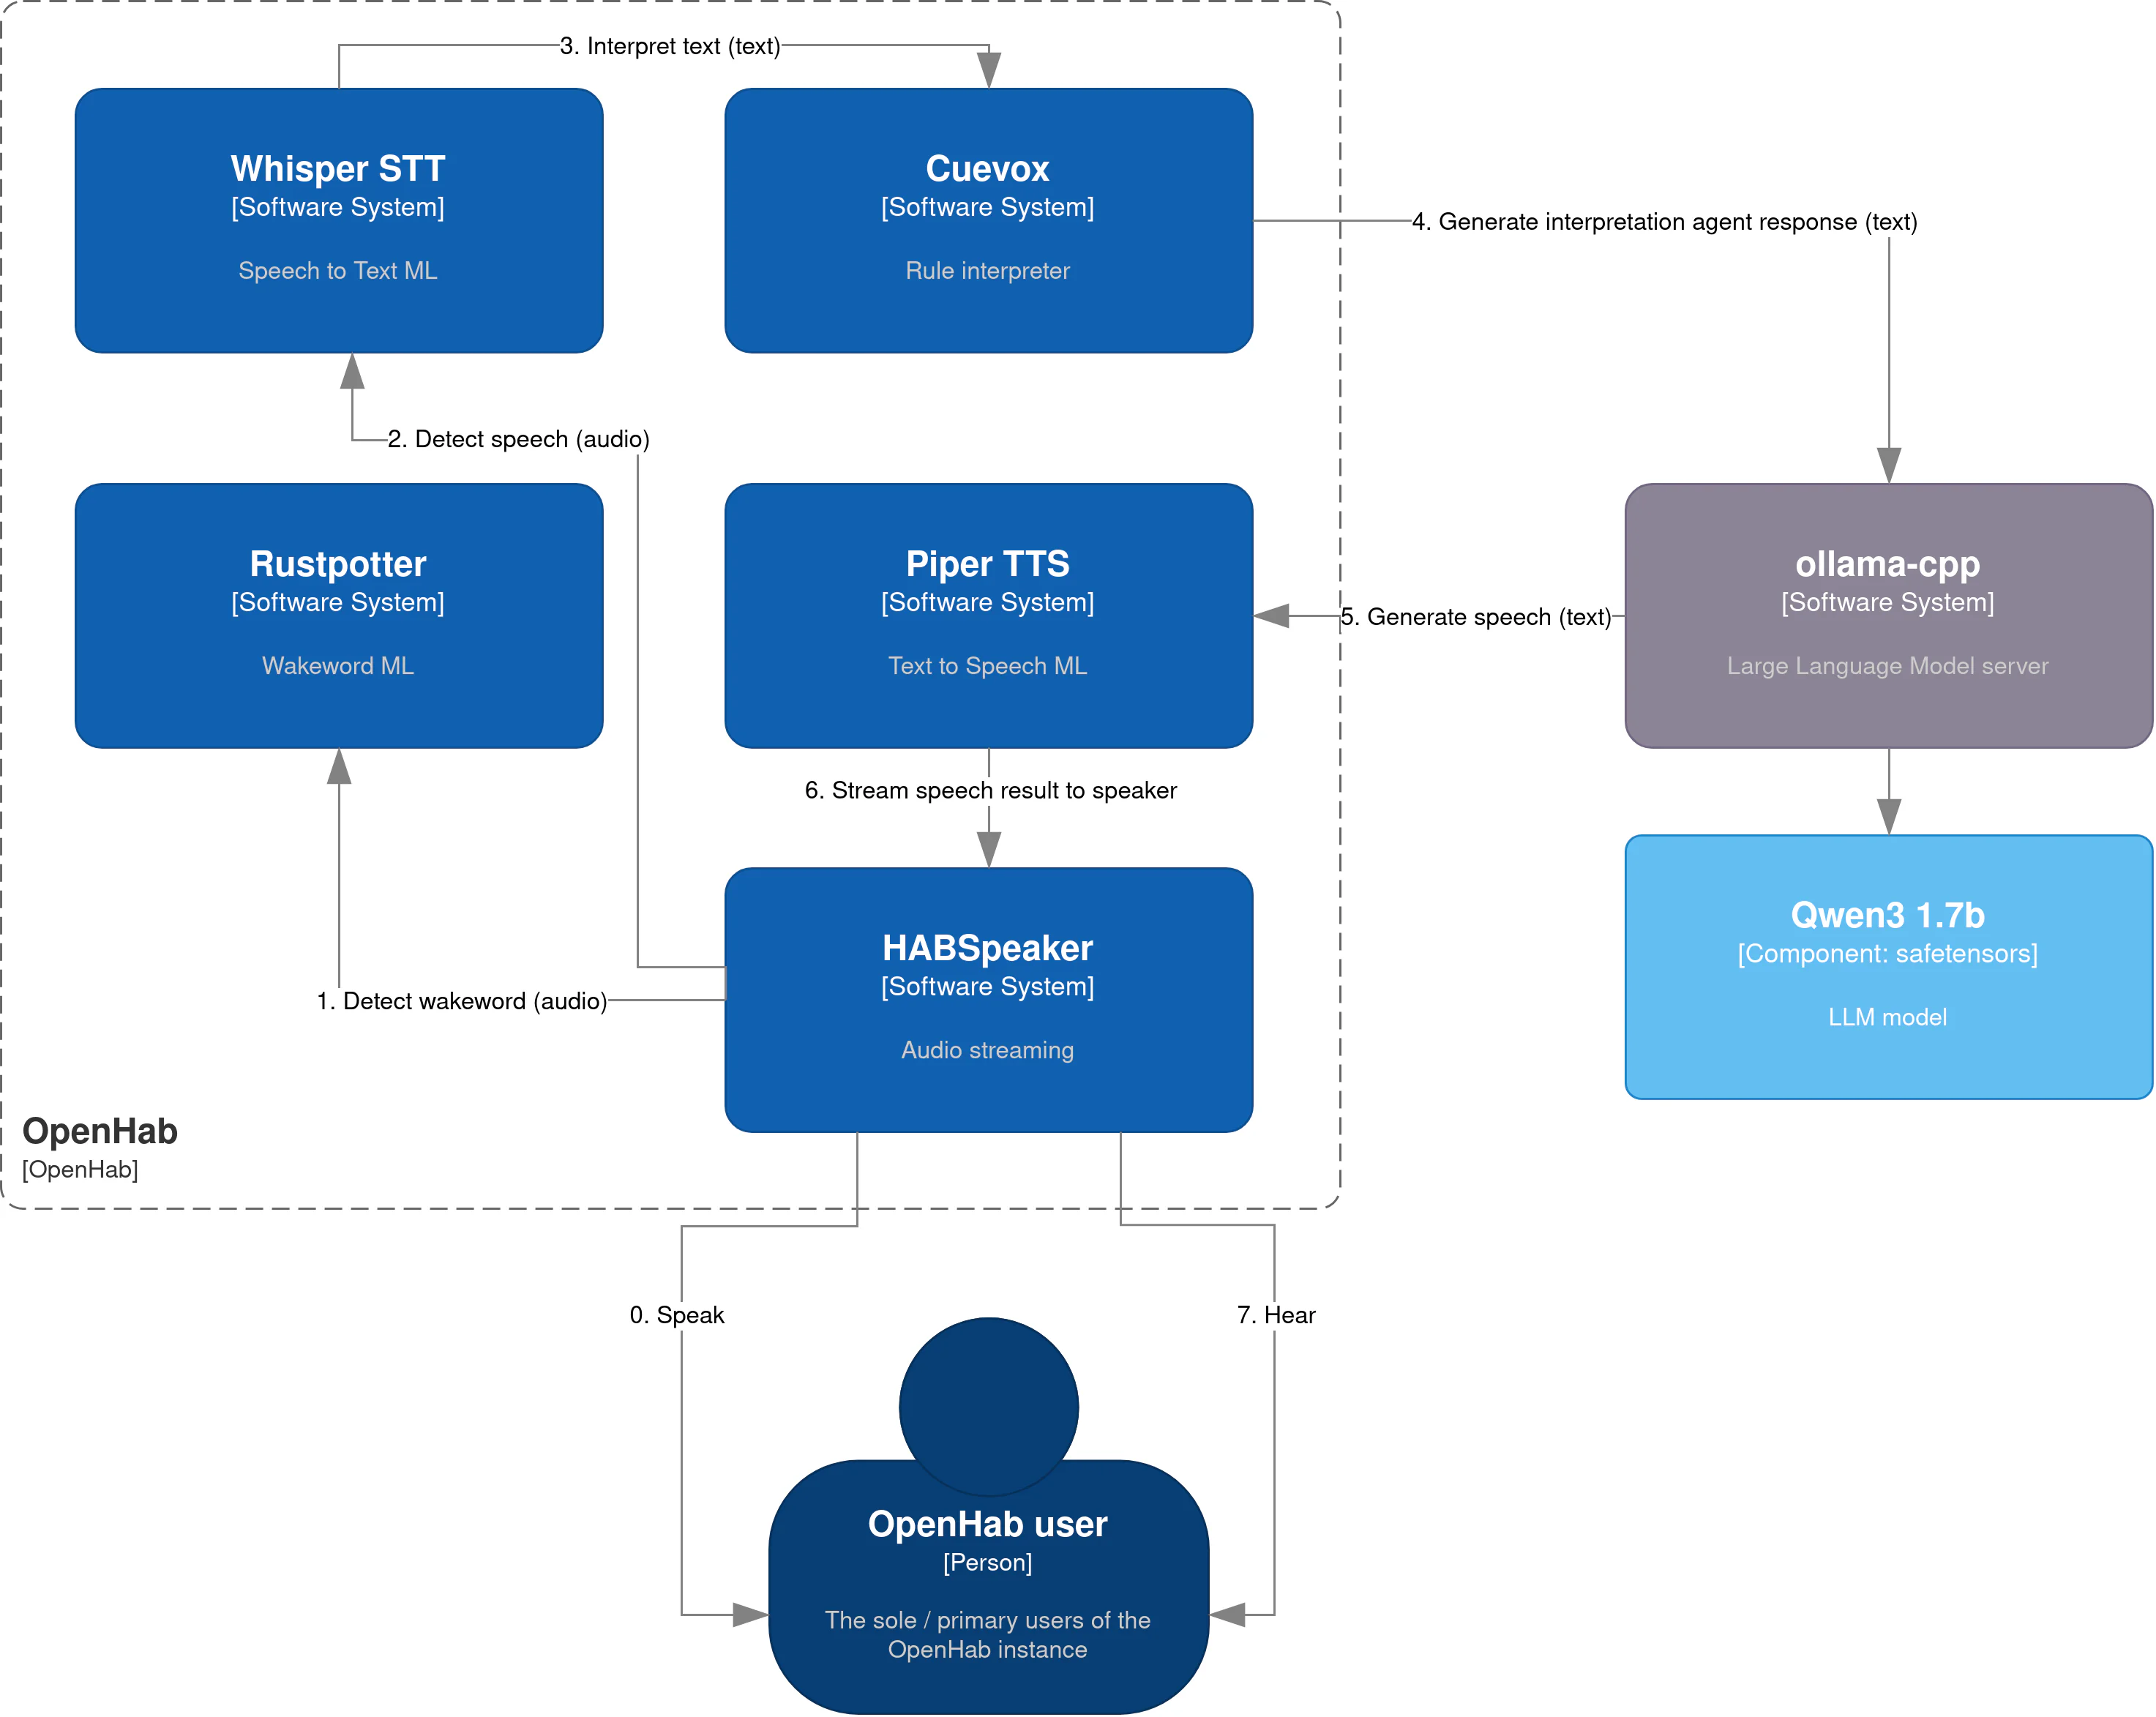 The overall architecture for this setup
Table of Contents
- Installing add-ons from OpenHAB and its community marketplace
- Download model files for TTS and STT services
- Install HABSpeaker Android app
- Use rustpotter-cli for wakeword training
- Creating glue logic things, items, scripts and rules
Tools & Technologies
The following tools and technologies will be used in this setup, almost all of them can be installed through the OpenHAB community marketplace without any additional steps.
- Whisper - Speech to Text
- Piper TTS - Text to Speech
- Rustpotter - Wakeword detection
- Cuevox - Rule interpreter
- HABSpeaker - Wireless microphone and speaker
- Ollama-CPP - Large Language Model (LLM) server
Procedure
The setup will involve the following steps and requires, in addition, to an OpenHAB installation, an Android phone running at least Android 5.1. SSH access into the OpenHAB console (port 8101 by default) is advised to perform several debugging steps if necessary.
First, we will install all the necessary addons through the marketplace and
add-on store. Next, download the model files for STT and TTS services to work.
Afterwards, we install the HABSpeaker Android app and subsequently perform
wakeword training with rustpotter-cli. This step has to be performed on
a laptop or desktop and can not be done from a mobile phone. Finally,
we tie it all together with the configuration of these various services and
creating several items, scripts and rules.
In short:
- Install add-ons from OpenHAB and community marketplace
- Download model files for TTS and STT
- Install Android app
- Perform wakeword training with
rustpotter-cli - Create glue logic items, scripts and rules.
1. Installing add-ons from OpenHAB and its community marketplace
To install the add-ons either navigate to
https://{OPENHABINSTANCE}/addons in a
browser or open the OpenHAB console via ssh ssh openhab@{OPENHABINSTANCE}.
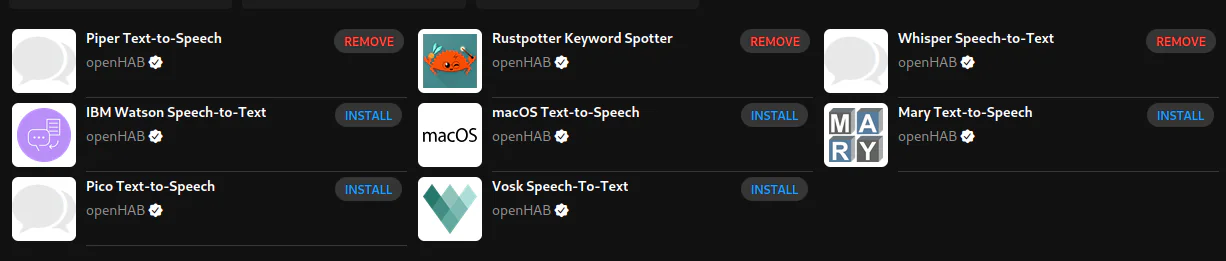 Overview of voice add-ons installed through OpenHAB browser interface
For the browser piper, whisper and rustpotter can be found under /addons/voice
simply searching in the bar for ‘piper’, ‘whisper’ and ‘rustpotter should find
them. Next, ‘habspeaker’ is found under the bindings section and ‘cuevox’
under the automation section.
For the console the installation is as follows.
addons install voice-pipertts
addons install voice-whisperstt
addons install voice-rustpotterks
addons install marketplace:161308
addons install marketplace:140655
If the marketplace addons like HABSpeaker and Cuevox can’t be found be sure
to enable the community marketplace
under settings/services/org.openhab.marketplace. Similarly if no single
addons can be installed in any capacity enable the online store through:
settings/services/org.openhab.addons.
The configuration for these new addons will be covered in the last section of this article.
2. Download model files for TTS and STT services
Next we must download both a model to convert text to speech and one to convert our speech into text. The TTS models are specialized in singular languages and come with one or more voices. You can try out voices for languages on Piper TTS Samples. I’d recommend using a model with a single voice as those tend to perform better.
From this samples page, the download link, to the individual huggingface pages
can also be found. From there both the .onnx and .onxx.json file need to
be downloaded and placed into /userdata/piper, be sure to keep the same
filenames and extensions.
For Whisper, we do not download individual languages but rather download
different size models. The responsiveness of the Speech to Text services will
vary greatly with the available computing hardware and the size of the model.
Because of these reasons I would suggest sticking to tiny.en if possible. If
English is not an option I would recommend medium because the
tiny multilingual version has a high error rate.
The following download links can be used for both:
For alternative version use the following huggingface page.
These downloaded models need to be placed in: /userdata/whisper, be sure to
give name them ggml-{VERSION}.bin
wget -O /userdata/whisper/ggml-medium.bin https://huggingface.co/ggerganov/whisper.cpp/resolve/main/ggml-medium.bin?download=true
wget -O /userdata/whisper/ggml-tiny.en.bin https://huggingface.co/ggerganov/whisper.cpp/resolve/main/ggml-tiny.en.bin?download=true
And that’s it already for downloading the models.
3. Install HABSpeaker Android app
Next, we need to download the HABspeaker Android from: HABSpeaker 0.0.31
Once installed we need to point the app to the url of the OpenHAB instance as
well as provide it an API key. These keys are created under the profile section
navigate to /profile on your instance in the browser and scroll down to the
bottom.
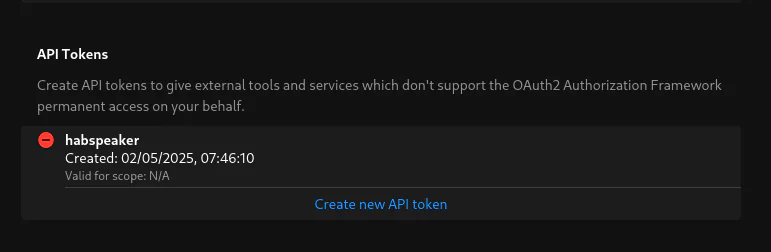 Creating API keys is done on the profile page
Store the API key somewhere safe for now we will need it in section five when we create the HABSpeaker thing.
4. Use rustpotter-cli for wakeword training
This is by far the most tedious section of this process but luckily the results are very rewarding. For wakeword training we need about 250 samples at various temper, pace and tonality, preferably with different voices, of a particular wakeword. This wakeword can be any word or utterance such as ‘ok google’.
I’d recommend something with very distinct articulation and a couple of syllabus. In addition, it is best to prevent wakewords that partially or largely contain extremely common words such as ‘hey mom’.
Installation
To start wakeword training, install rustpotter-cli and either use the Android phone builtin recorder app or use the desktop with a program such as audacity to record the wakeword.
Both programs are available on Linux, Windows and Mac, for Linux you should be
able to find audacity in your package manager. For any other platform the
following two download links should lead to a working installer:
If you are on Arch Linux it is best to compile rustpotter-cli from source.
This is straightforward using a single cargo build command inside the root
of the source.
An alternative to this guide on using rustpotter-cli can be found in the
README of the source code: https://github.com/GiviMAD/rustpotter-cli
Gather audio files
Next start recording the wakeword. For this it is important that you think of the maximum length required to speak this wakeword. A big part of training a Convolutional Neural Network (CNN), or any Machine Learning (ML) algorithm for that matter is cleaning training data. Garbage in, garbage out, as simple as that.
The audio sequences in training will be stretched to the longest duration of any of the audio sequences with silence. So if the fast majority of the files is 0.5 seconds but you have one file with 5 seconds of audio, all these short files will get filled with 4.5 seconds of silence. This is bad for training as it makes the entire input space of audio files all sound very similar (mostly silence)!
The recording should be done using a mono wav audio track with 16 bit integers or 32bit float at 44100 or 48000 KHz.
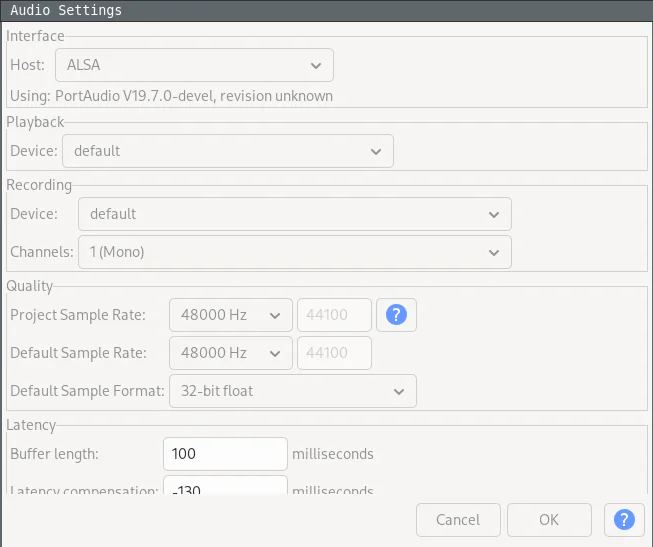 Configuring Audacity recording settings
Wake Word
These files must be labeled using [] brackets as those identify the
wakeword. For instance [ok_google]1.wav to use ‘ok google’ as wake word. In
principle this can be used to train for multiple wake words but I wouldn’t
recommend this.
Try to vary all aspects of the recording when prononcing the wakeword. speed, pitch, volume, nasal, screaming, etc. I try to record these in batches of about 50 at a time. In total you will need around 250 for good results.
For every 10 of these recordings you should keep 1 separate. Separate
these into a train and test folder with the majority of files located
in ‘train’.
To further tune the wake word recordings it is best to cut away silence on the longest wake words as to reduce the longest recording length.
Noise
After recording these wake words and placing those into both folders we also need to record other audio. This is any audio such as noise, talking, music, dishwashers etc. I can not emphasize enough we need as much of this as we can get.
In total I would recommend about 8000 files. This might seem like a difficult
task but we will split the files based on the maximum wake word length. To make
these recordings, perform several activities with audacity running such as
typing and talking. Another great method is to use the android recorder
while walking around the house. You can place these files in any folder and we
will use ffmpeg to split them. Below is an example for input.wav for a
segment length of 2 seconds. The segment length should match your longest wake
word recording.
ffmpeg -i input.wav -f segment -bitexact -segment_time 2 -acodec pcm_s16le -ar 48000 -ac 1 output-%1d.wav
This will generate a list of output-1.wav, output-2.wav, etc. Move these
files into groups of 10 into the training and test folder with a ratio of 9 to 1
as well.
Later, we will tune the resulting models by also training against false detections. These detections can automatically be recorded and stored when configuring rustpotter in OpenHAB.
The final folder structure should look something like the figure below.
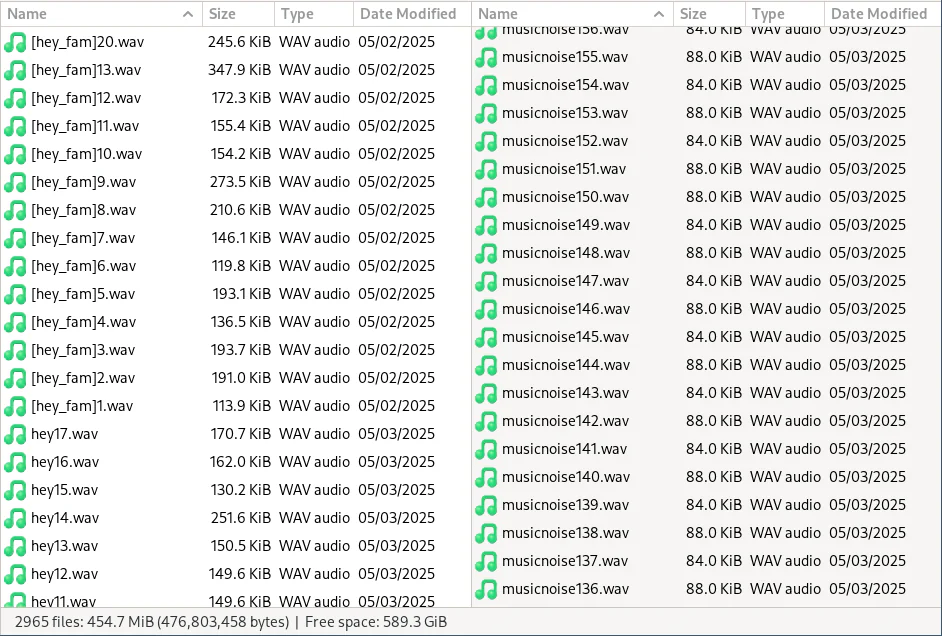 Training folder file layout
Train
Training is easy, with the files ready all it takes is a single command. Here
we create a large model using a train and test folder:
rustpotter-cli train -t large --train-dir train --test-dir test --test-epochs 10 --epochs 1500 -l 0.11 trained-large-epoch-1000.rpw
Training will take some time but typically happens within a hour on a modern computer. The first iteration can take a while to start if there is a lot of audio to load.
Once the training is done rename the rpw file to match the wake word. For
example ok_google.rpw. Move this file into /openhab/userdata/rustpotter/.
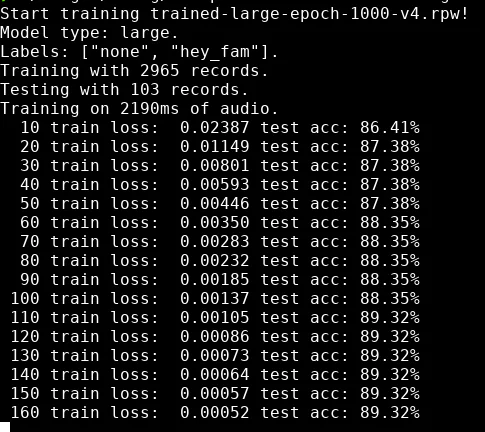 Output of rustpotter cli while training
5. Creating glue logic things, items, scripts and rules
Creating the things, items and settings up the config is done in 8 steps.
- Create VoiceCommand item
- Configure voice interpreter item
- Configure voice services
-
npm installcuevox - Add rule script (javascript)
- Add rule trigger
- Add HABSpeaker thing
- Configure default audio sinks and sources
5.1. Create VoiceCommand item
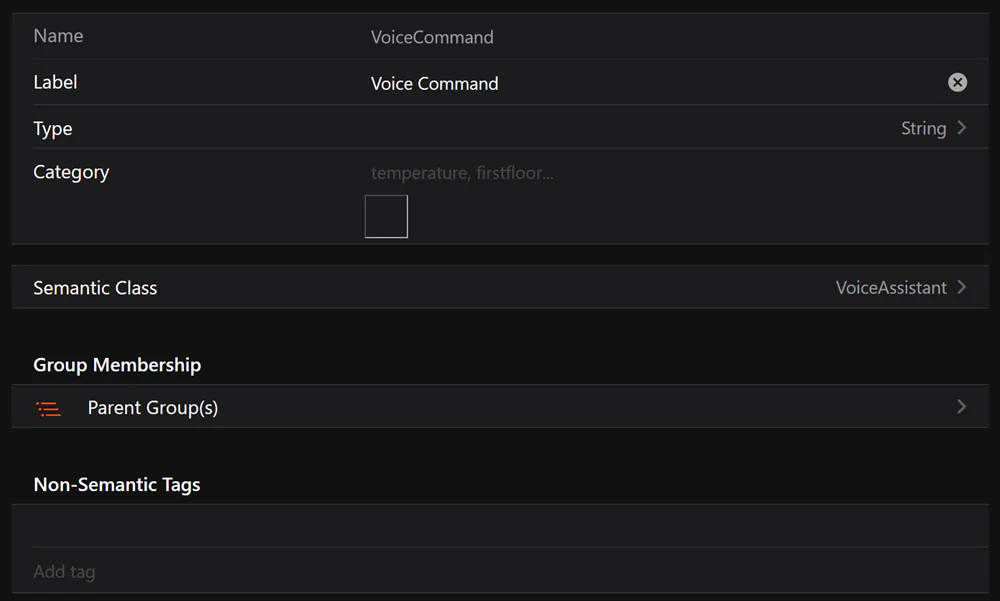 1. Create the voice command item
5.2. Configure voice interpreter item
 2. Configure the voice interpreter item
 2. Assign the voice interpreter item
5.3. Configure voice services
For Whisper be sure to select the correct model and enable preload. For piper also enable preload.
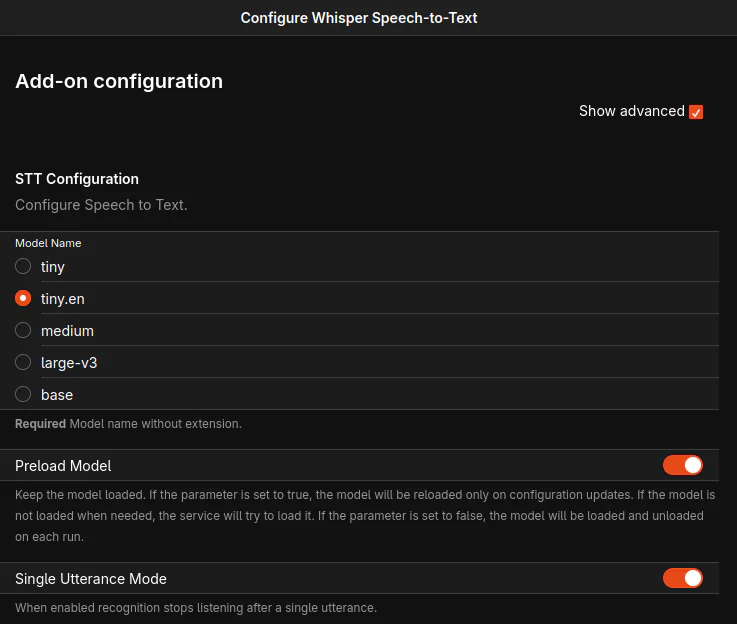 3. Configure whisper Speech to Text (STT) ‘/settings/addons/voice-whisperstt’
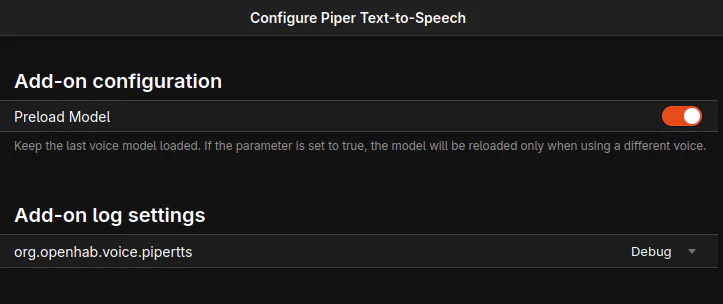 3. Configure piper Text to Speech (TTS) ‘/settings/addons/voice-pipertts’
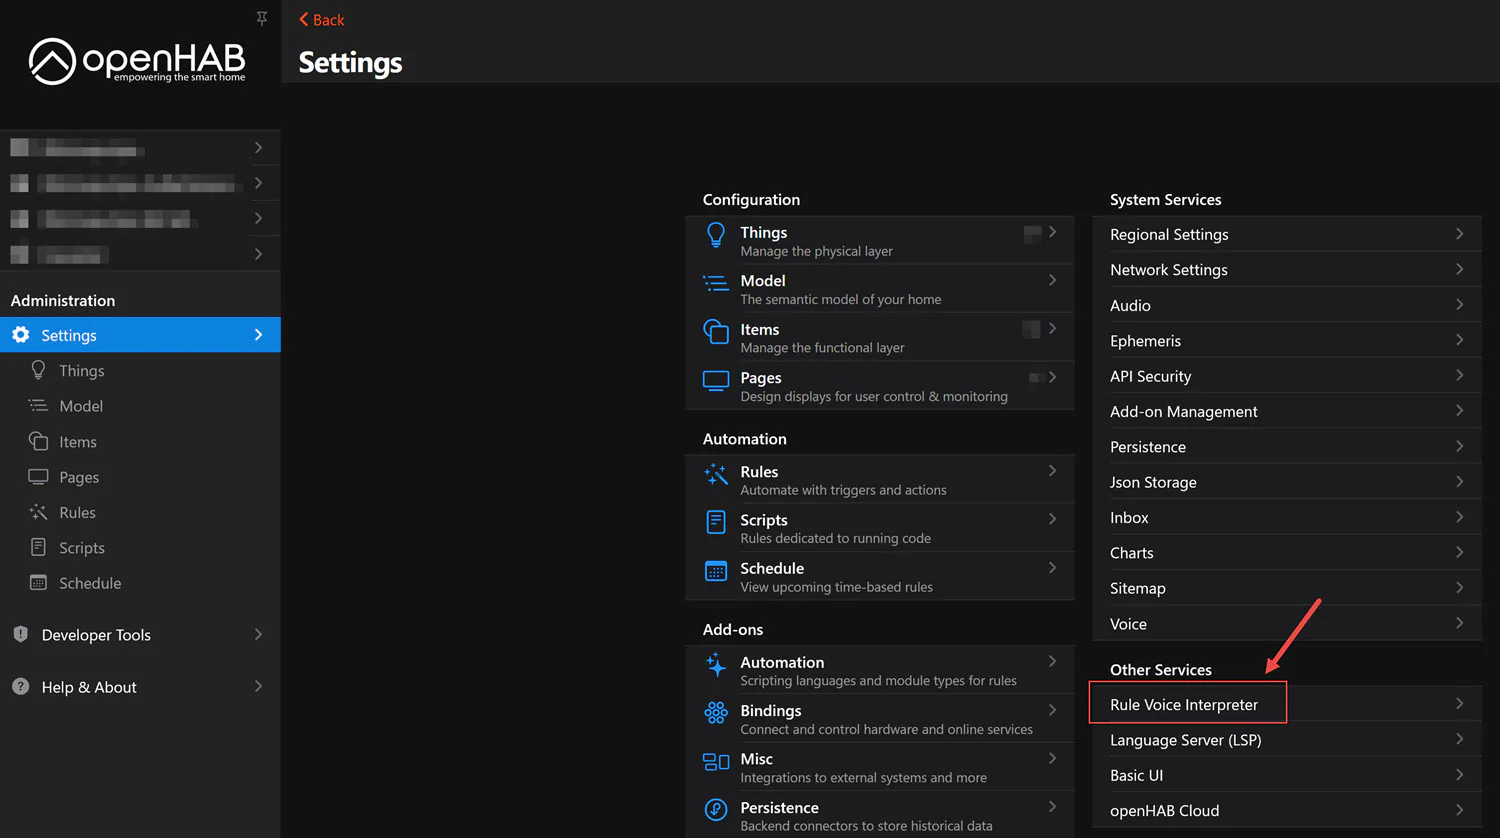
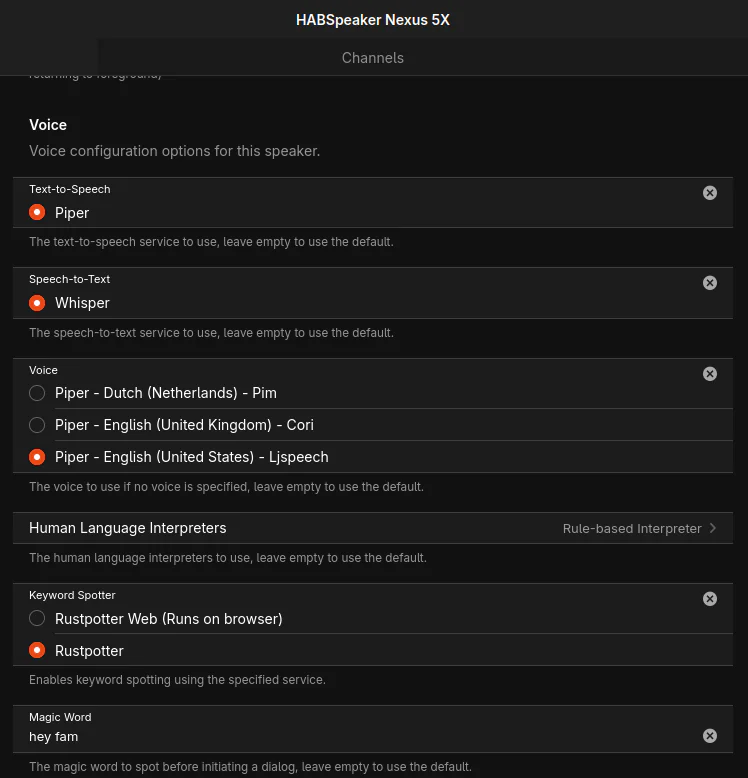
The general voice settings are slightly more involved, select the default voice and be sure to select ‘rule-based interpreter’, next be sure to set the correct wake word for rustpotter. Optionally, a listen melody can be provided.
 3. Configure voice ‘/settings/services/org.openhab.voice’
5.4. Install cuevox
Simply clone and npm install the repository inside the OpenHAB conf directory.
cd /openhab/conf/automation
git clone https://github.com/JanMattner/voice-control-openhab.git
cd js
npm install --omit=dev ../voice-control-openhab/
5.5. Create script
Add a script named ‘VoiceControl’ under /settings/scripts/, press ‘+’ in the right bottom and add
a new javascript with the following, replacing the first line ollamaURL = with
your own ollama IP.:
(function (data) {
  let ollamaURL = "http://192.168.6.34:11434/api/generate";
  let ollamaResponseEnd = "\n\u003c/think\u003e\n\n";
  let logger = require('openhab').log('debug-cuevox');
  let vc = require('voice-control-openhab').voiceCommandRules;
  var response = vc.interpretUtterance(items.getItem("VoiceCommand").state);

  if(!response) {
    logger.warn("Failed to get response from utterance!");
    return;
  }

  const postargs = {
    model: "qwen3:1.7b",
    prompt: `
      you are an agent providing responses to tasks users give to this house.
      You are to reply in short and concise manner as if you have executed these tasks on the users behalf.
      The response need to be a single sentence of solely text with no special characters or markup written in past tense.
      With each user task you will receive both their original message as well as a status of how the task was executed.
      These prompts you receive are formatted in JSON.
      The response should reflect the "status" being either "success" or "failed".
      The response contains "input" which is the users original input and "remainingTokens" which are the parts of the input sentence that couldn't be understood.
      You have a distinct use of grammar and sentence structure in your responses that is representative of the British Victorian era and you admire Queen Victoria.
      This is this prompt:
      ` + response,
    stream: false
  };

  var result = actions.HTTP.sendHttpPostRequest(ollamaURL, 'application/json', JSON.stringify(postargs), 30 * 1000);
  if(result) {
    let jsonResult = JSON.parse(result);
    let text = jsonResult.response.substr(jsonResult.response.indexOf(ollamaResponseEnd) + ollamaResponseEnd.length);
    logger.info('Ollama Success, input: {}, response: {}', response, text);
    actions.Voice.say(text);
  }
  else {
    logger.error('Ollama Error');
    actions.Voice.say('Ollama Error');
  }
})(this.event);
5.6. Create rule
Navigate to /settings/rules to add a new rule.
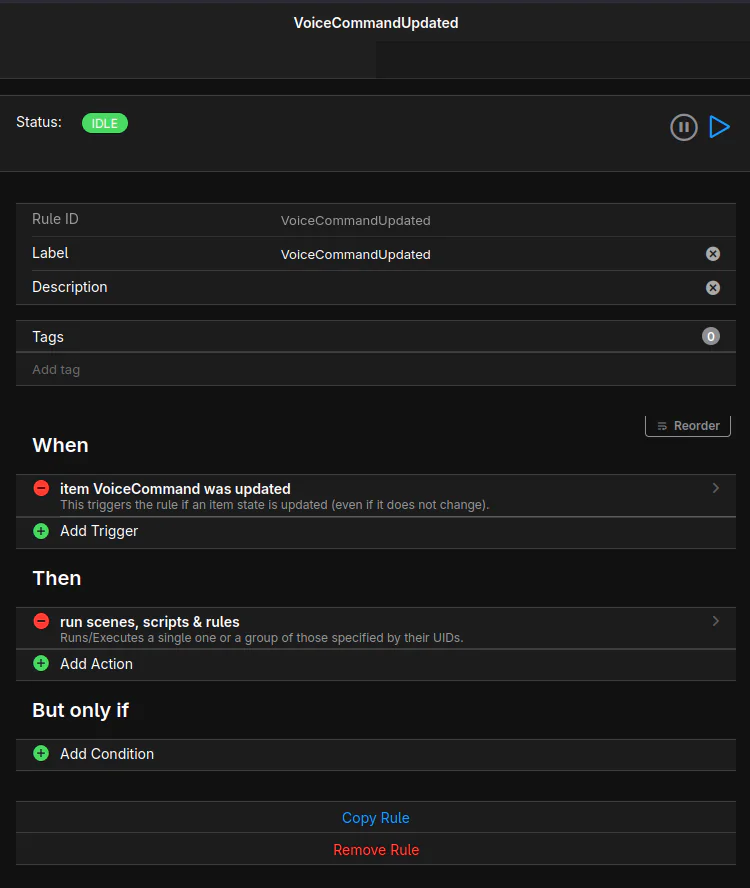 6. Create rule to trigger script ‘/settings/rules/’
5.7. Add HABSpeaker thing
Navigate to /settings/things/add/140655, create a new thing with a simple ID.
Next, enable advanced and scroll down to voice, be sure the settings match the
general voice settings.
 7. add HABSpeaker ‘/settings/services/org.openhab.voice’
With the thing added we can open the Android app to configure it. Here we
use the thing ID configured earlier as well as the API token that was created.
For the URL the protocol such as http:// or https:// must be included as
well. If the OpenHAB instance uses https:// with a self signed certificate,
HABSpeaker will not work!
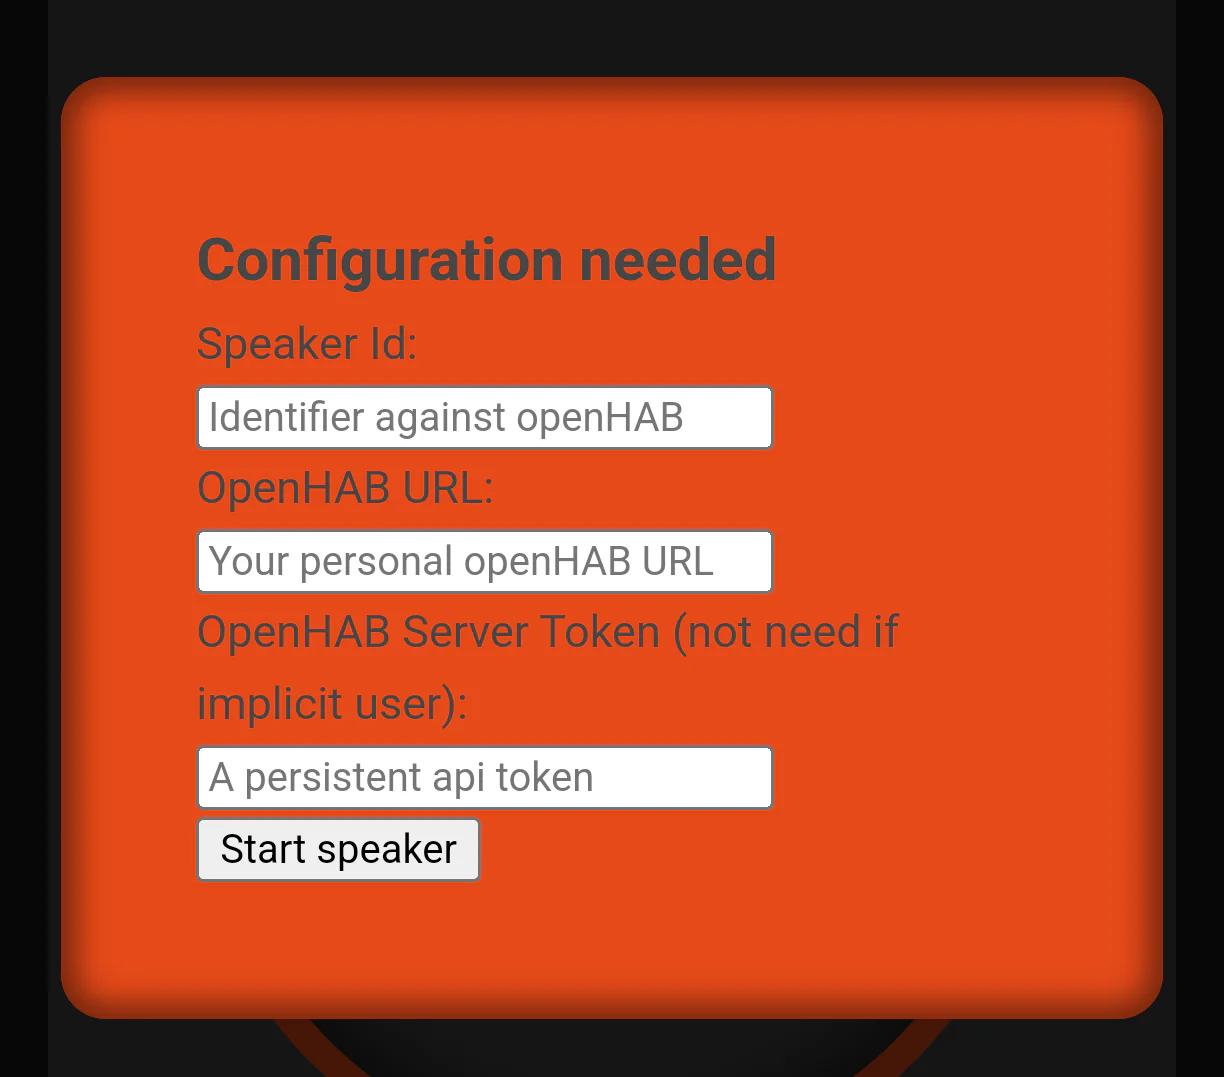 7. Configure HABSpeaker APP
Once the HABSpeaker is started, leave the application running, and navigate to
/settings/services/org.openhab.audio. Here you can change the default sink and
source audio devices for OpenHAB. Should you wish to choose the HABSpeaker you
can only do this when the application is running on the Android phone.
Otherwise you can leave the sink on Web Audio. To enable web audio for the
browser goto /about and check Enable Web Audio sink support below.
 7. Enable browser web audio ‘/about’
Trying it all out
And with all of that we are finally done, now when you open the HABSpeaker app
and speak the wake word the center icon should change and show a microphone
symbol. If you then speak turn off all the lights in the house and have a
location named house any item with the semantic class light that is a child
of house will be switched off!
Next, Ollama-CPP receives the text prompt and generates a response to provide
feedback such as; all the lights in the house are turned off.
Conclusion and possible extensions
Cuevox is an extensible rule interpreter that can have its grammar extended. Next steps could extend this grammar for it to be able to change color temperature or the color of lights.
For diagnostics purposes it can be a good idea to show the VoiceCommand item on a dashboard so that the current sentence can be visualized.
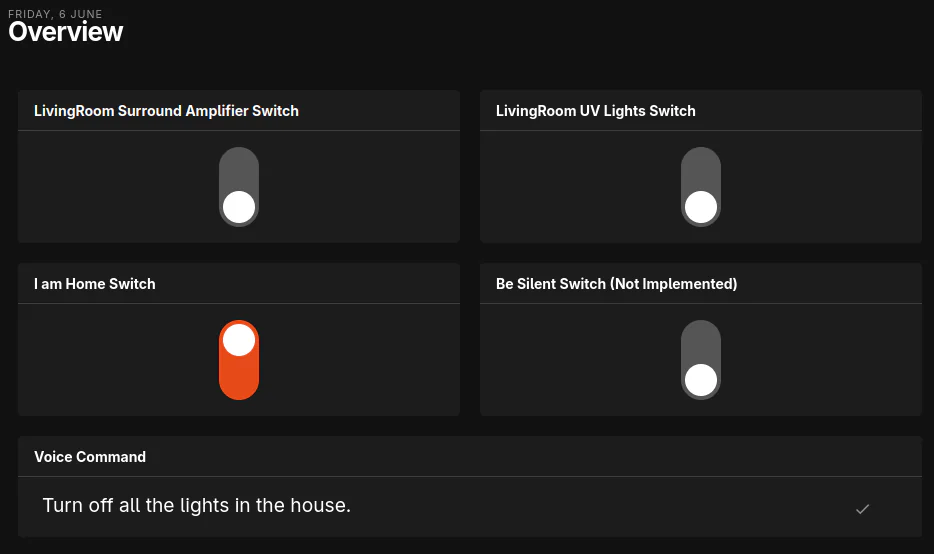 Visualize VoiceCommand sentence
I hope you enjoy entirely local voice control using OpenHAB!